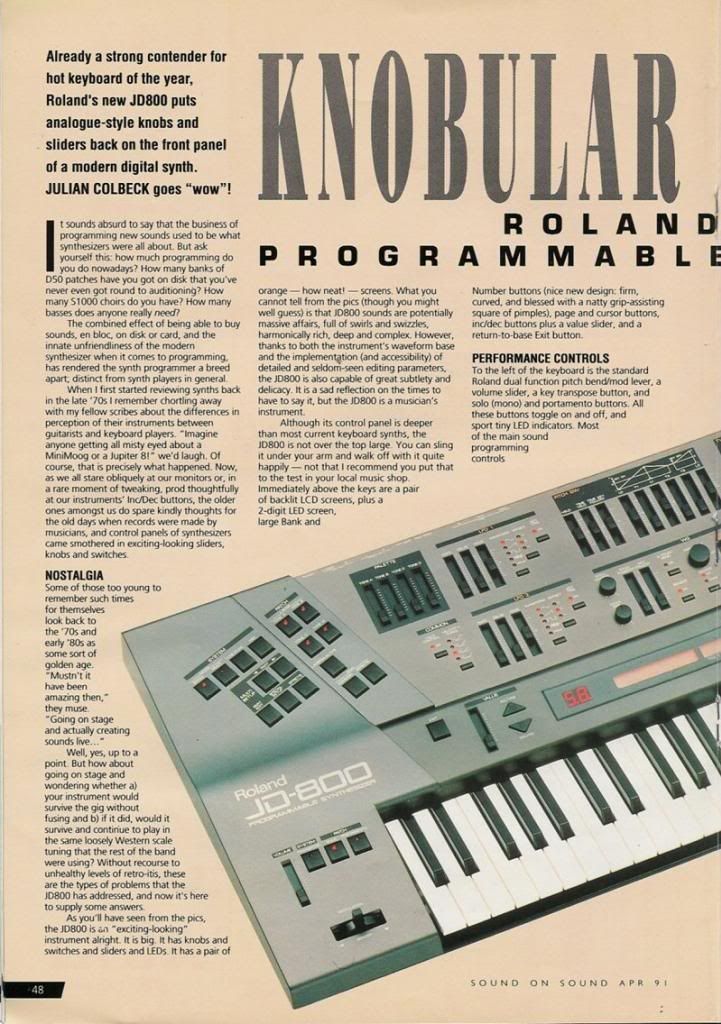
Additive (Fourier) synthesis
Amplitude (ring) modulation
FM synthesis
Granular synthesis
Linear Arithmetic (LA) synthesis
PCM sample playback synthesis
Phase Distortion synthesis
Physical modeling synthesis
Realtime convolution and modulation (RCM) synthesis
Subtractive synthesis
Vector synthesis
Wave sequencing synthesis
Wavetable synthesis
Additive (Fourier) synthesis
Every sound in the nature, no matter how complex, can be expressed as a sum of sinewave functions of various frequencies. Those can be partials or harmonics of the original fundamental frequency. Each harmonic is an integer multiple of the fundamental frequency while partial isn’t.

In the image above we have an example of fundamental frequency sinewave and it’s 2nd and 4th harmonics summed to create the final sound.
Now, lets take another example, this time in frequency domain. If we take a short snapshot of the sound of electric guitar and look at it’s spectral characteristic, we will see that it contains peaks at some frequencies, and valleys at others. Just as seen in the image below.

In next millisecond these peaks and valleys move a little bit and go to different frequencies. Now imagine you have a generator that can generate sinewaves at the same frequencies where guitar creates these peaks, and control the volume envelope of each sinewave. This generator is exactly what additive synthesizer does.
Such synthesizer has a bank of oscillators which are tuned to multiples of the base frequency (harmonics). And each oscillator has its own volume envelope. The more realistic you want additive synthesizer to be, the more oscillators you need.

The name Fourier synthesis comes from Jean Baptiste Joseph de Fourier who (among many other things) found out that every sound can be formed from summation of sine waves. The most known additive synthesizers are Kawai K-5 and later model K-5000 which has over 1000 parameters per patch, so if you like editing for hours, there’s a nice addition to your studio setup.
Amplitude (ring) modulation
In general, modulation is the process of varying a carrier signal (usually sinusoidal signal) with a modulating signal. This can be done in three ways, by modulating: phase, frequency or amplitude of the signal. A device that performs this modulation is a modulator. What we will cover in this article is amplitude (ring) modulation.

Image above shows us typical amplitude modulator. Let’s assume that we bring two sinusoidal signals at modulator’s inputs. The first one (f1) has a frequency of 1000 Hz, and second (f2) one has a frequency of 100 Hz. In mathematical terms, what amplitude modulator does is multiplies two input signals. Please keep in mind that we don’t talk about multiplying numbers (in this case 100 and 1000), we are talking about multiplying sine waves. This is completely different story, and a little bit more complicated. If you are interested into this, get a math book and read about multiplying of two sine waves. Since i don’t want to bother you with too much ”why stuff”, lets just say that at modulator’s output we will have their sum and difference: f1+f2 and f1-f2, which means 1100 Hz and 900 Hz respectively (these are the frequiencies, not plain numbers). Spectrogram below shows us result of mixing f1 and f2 inside amplitude modulator.

Time domain
Change of carrier’s amplitude in a function that depends by the level of modulating signal results in a process we call amplitude modulation. This can clearly be seen on the image below. Vertical axis shows the amplitude, while horizontal shows the time (this is a typical waveform display). Modulating signal of human voice (image 1) modulates the amplitude of the carrier (image 2) which results in modulation (image 3).
 Image1-voice
 Image 2-carrier
 Image 3-modulation
These images are showing a time frame of only few milliseconds, just to show you a brief conception of the mixing process inside amplitude modulator. Image below shows us combination of image 1 and image 3, so that you can see it in the most simple way how human voice modulates the amplitude of the carrier.

Frequency domain
Lets take a look at spectral characteristics of the same example. We took human voice which was about 3 kHz wide and mixed it with a carrier whose frequency is 10 kHz. At modulator’s output we get two side bands which contain the same information, but are mirrored against each other. The mirror itself is the carrier frequency of 10 kHz. Those two side bands have names: upper and lower side band (USB and LSB). The upper sideband is the same human voice, but transposed to 10 kHz, while to lower sideband is the inverted human voice. More on inversion later.
 Image 4 – Human voice
 Image 5 – Amplitude modulation at 10 kHz
If you want to have fun with transposed human voices, all that is left now is to use sharp filter to remove the lower sideband. What you have on above image marked as USB is actually a human voice transposed to 10 kHz. To have more useable ”weird voices”, i recommend lower carrier frequencies, max 3 kHz, and you can get all sorts of Donald Duck and space voices.
Spectrum inversion
Ever wondered how would this song sound if you could invert it in frequency domain (tones that were low would now be high, and those tones that were high would now be low)? Well, if you understood the process of amplitude modulation, you can do it too. Here is short example: Take a song and apply a strong 8 kHz low pass filter. This is needed to put the song inside a limited frequency band to avoid aliasing problems later. Mix this song with 8 kHz carrier inside amplitude modulator. Now you got two copies of the song. One is in the range 0-8 kHz, and the other one is in the range 8-16 kHz. The first one is inverted in frequency domain, while the second one is the same as original, but transposed to 8 kHz. Now all that is left is to apply strong 8 kHz low pass filter to remove the upper sideband, and you got frequency inverted song.
Ring or Amplitude modulation?
Both names are correct, however if you need to choose the more appropriate one, it would be ring modulator. Because when you say ring modulator is exactly known what do you mean by that: An analog circuit made of diodes, which usually has a shape of the ring and multiplies two input signals.
Amplitude modulator does that too, but not always. Reason for this is there are few different types of amplitude modulators. For example in radio transmission techniques amplitude modulator does not only have sum and difference at the output, but also a carrier signal. This is the most common amplitude modulator in the world, and the whole AM radio broadcast is based on it. If used in our example, on image above there would be a large signal present at 10 kHz with amplitude about twice bigger than any of the sidebands. But as you can see, there is nothing at 10 kHz, because we used a pure ring modulator.
If we look at the math, amplitude modulation will give us only the sum and difference of input signals. Thus amplitude modulation is correct name too, but to avoid any confusion with radio broadcast technology it is better to use term ”ring modulator”. Hint: carrier was in a way a byproduct of early amplitude modulators, but turned out useful for broadcasters, and is used to drive an AGC (automatic gain circuit) in an old type AM radios, so that the signal doesn’t fade that much in the volume during various ever changing atmospheric conditions).
FM synthesis
In FM synthesis, one (or more) oscillator is used to modulate frequency of another one. Although both oscillators are using simple waveforms (like sine wave), result can be a sound with very complex harmonic structure. Usually one oscillator we call modulator, and the other one carrier.

As seen in two examples on the image above, the complexity of result wave always depends on the output level of the modulator (marked with red). If we increase the level of carrier, we are just increasing overall sound volume. In first example (left) modulator’s level is set to 0. Resulting tone is the same as carrier. In the second example (right) we increased modulator’s output level to 10, which resulted in a tone that is totally different from both modulator and carrier tones.
Using different levels for modulation we are creating different harmonic structures at the output. However this is not enough, because each instrument have a characteristic way in which it’s sound changes during the time. This is called the envelope. For example guitar begins loud and then gradually reduces its volume and harmonic content. On the other hand Hammond organ maintains the same volume and harmonic content as long as you are holding the key. As you can see, these two instruments have different envelopes. That’s the reason why FM synthesizers (like Yamaha DX7, SY-77 etc.) have envelopes on each oscillator. A package of oscillator + envelope is usually called an Operator. Operators can be arranged in many different ways called algorithms. What we described above is the simplest algorithm consisting of one modulator and one carrier.

 To create more complex sounds, you need more than one operator. In that case you can have an operator that is modulating another operator, which is again modulating another operator that modulates the lowest operator (which is carrier), as seen on algorithm example 1. Or you can have three operators at the same time modulating one operator, as seen on algorithm example 2.

Simple FM modulation
Some analog synthesizers do have FM, however this is just a basic FM with a lot of restrictions. To do proper FM you need more than two oscillators, and each needs to have its own volume envelope, plus many other things that are too complex to be properly implemented in analog synthesizer. It would cost too much just to sound as DX-7, which you can buy for much less. However, if you are good in FM programming and have analogue synth which features FM, you can do some nice FM sounds (bells, metals, etc.). However to achieve a true DX sound you need PM or Phase Modulation. This is what drives all of the FM synthesis types of synths that we have on the market.
FM emulation
Even if your synthesizer does not have any kind of FM, but has enough fast LFO you can create a primitive kind of frequency modulation (that is modulation, not FM synthesis). Reason for this is that technically pitch modulation is the same thing as frequency modulation (FM). So with LFO you can create frequency-modulated sound. Keep in mind that this is all you can get, and this is far away from FM synthesis. Take the LFO and set it to high speed. Route it to modulate the pitch of oscillator. Now if possible, apply envelope to modulate the output of the LFO. If not possible, then use LFO Fade function. You need the Fade Out function. Its Purpose is to reduce the output level of LFO to zero after a short time. If LFO has a delay, you can set it to hold the LFO at maximum level, and then let Fade function fades it away. We talk about very short times here for the delay (50-200ms) and fade about 300-1000 ms. Experiment here. For oscillator (wave generator) waveform, choose sine wave. For LFO also choose a sine wave. Trigger high tones on the keyboard, and adjust the amount of LFO modulation that you are applying to pitch modulation until you are satisfied with the result. With enough fast LFO and good Fade function, you should be able to create a few nice bell sounds.
Granular synhesis
In granular synthesis samples are split in small pieces of around 1 to 100 milliseconds in length these small pieces are called grains. Multiple grains may be layered on top of each other all playing at different speed and volume. You can imagine it like some kind of wavetable synthesis, but here samples are played so short that you hear them as a timbre, not as a rhythm. By varying the waveform, envelope, duration and density many different sounds can be produced, not possible by any other synthesis type. There are many PC programs which do granular synthesis. One of the more famous ones is definitely Kaivo by Madrona Labs.

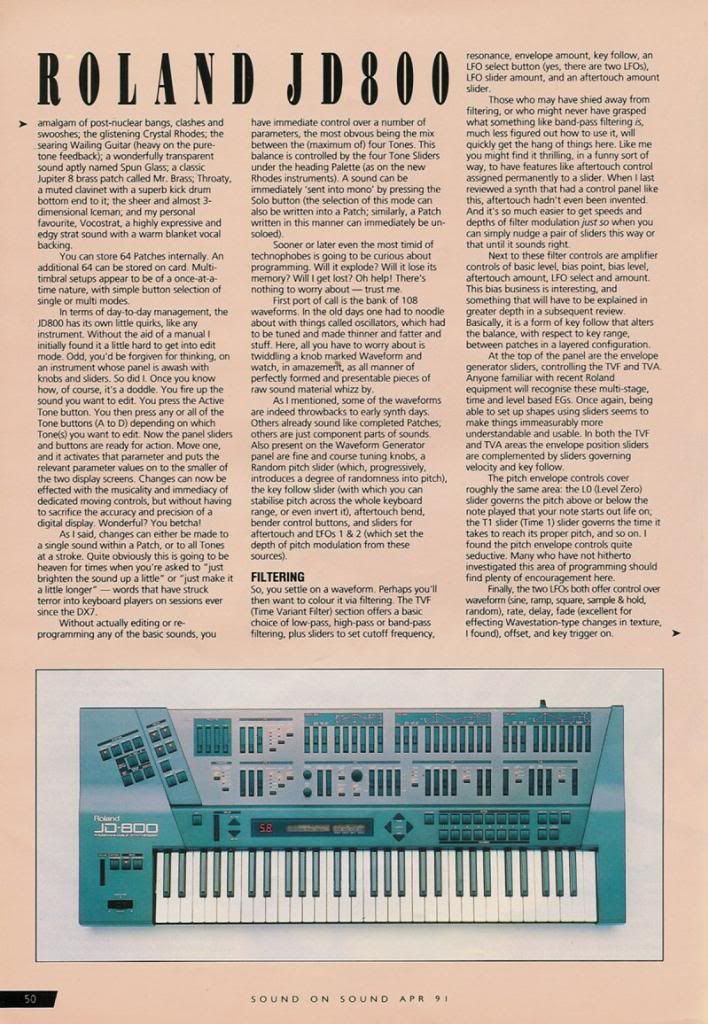
Linear arithmetic (LA) synthesis
Introduced by Roland D-50 model in mid 80’s. At that time biggest problem in sample playback was limited memory. If you could build a sample player with individual samples, it would cost enormously, because chip ROM sizes on the market were ridiculously low and expensive. Some observations on human hearing showed that most important thing in defining each sound unique to other was the attack transient of a sound. That is exactly how D-50 worked. It used short sampled attack transients and analog style oscillators for the sustained part of the sound. Short samples didn’t required big memory, which reduced the cost of the synth.

Today this kind of synthesis is probably no longer needed, however it still sounds unique. We can add that analog emulation part in D-50 is awesome making it really powerful and thick sounding digital poly synth.
PCM sample playback synthesis
Once analog signal gets converted into digital through sampling (digitizing) process, the result is called a sample. Pulse Code Modulation (PCM) is the coding technique used in this process. PCM is used in all digital instruments, and digital devices like PC, mobile phones, etc. Example of PCM could be ‘.wav’ and ‘.aif’ types of files on your PC. Sampling is a very simple process. You take the instrument, connect it to soundcard input and use recording application that will digitize it, and turn it into PCM. The core of this process is happening in the soundcard inside analog to digital converter. The better converter you have, the better results. Four parameters define the quality of A/D converter. Sampling rate, bit depth, dynamic range and signal to noise ratio. Sample is then stored in the memory (RAM / hard disk).

A device that is capable of performing functions of sampling and storing is called a sampler. If a device can play back those samples at different pitches, we call it a sample playback synthesizer. About 90% of today’s synthesizers are of this kind and they all use subtractive synthesis method. Some samplers have a lot of advanced functions previously found only on synthesizers. Among most popular of them were the Emulator E4, Roland S-760, Akai S3000, and Yamaha’s A series.
Phase distortion synthesis
Phase distortion synthesis is a synthesis method introduced in 1984 by Casio in its CZ range of synthesizers, and similar to phase modulation synthesis in the sense that both methods dynamically change the harmonic content of a carrier waveform by application of another waveform (modulator) in the time domain. Casio introduced the term ‘phase distortion’.

From programmer’s point of view, what happens here is that every waveform has a range of distortion which when set at value 0 results in a pure sine wave, and when set at max, results in a waveform selected on the front panel (ie. a saw, square, etc). Multi stage envelopes can be used to sweep back and forth between these two extreme points, resulting in a timbre change. Essentially this is how phase distortion operates. Results are pretty unique though. There are some PD demos on this site in the Store area.
Physical modeling synthesis
As the power of DSP processors advanced, it was possible to do the synthesis of sound by using a set of equations and algorithms to simulate a physical source of a sound. This method mathematically models individual instruments and their parts, for example – metal string, a body of acoustic guitar, a pluck, etc. All this can be described by mathematical means.

First physical modeling synth was Yamaha VL-1. Later came out Korg Prophecy, and the Z1. Not many more since then, aside Kaivo and some others.
Realtime convolution and modulation synthesis (RCM)
Two synthesizers in the world use this kind of synthesis and those are Yamaha SY-77 (TG-77) and SY-99. This comes as a third type of synthesis they offer next to standard subtractive synthesis (AWM) and frequency modulation synthesis (FM). The name itself sounds complicated, but in reality the process is very simple. There are actually two configurations available.

In first one, you take the whole AWM element (waveform, pitch, filter, env) and insert it as modulator input for FM operator. That is, instead of simple sine wave as modulator, you use whole tone with its own waveform, applied filter and amp. This offers even more complicated FM synthesis.

In second configuration (image above) you can take the whole FM section and feed it into AWM section. That is, the sound that was created in FM section of synth becomes a ‘waveform’ that you process in AWM section. The AWM section is standard subtractive processing line. For example, if you apply a controller to modulate FM section, you can have ‘live’ and constantly changing waveform (marked as ”=” on image above) that is altering its timbre all the time. Of course, then you can apply a filter and envelopes of the AWM section to change the sound in more complex way. I know this all sound exotic, but it requires a lot of programming to do something good and useful actually.
Subtractive synthesis
This is the most common type of synthesis and is used on all analog and digital synthesizers and samplers. It starts with a sound that is sent to filter and then to amplifier. By doing this, you are subtracting some partials that existed in original sound, and you are changing sound’s envelope. This process is in-depth described in synthesizer basics article. Link here.
Vector synthesis
Introduced in 1985 by Chris Meyer, it was totally new concept in sound shaping. When asked about how did he invented it, Chris said: ‘One engineer was asking me to explain how various instruments performed crossfades. I had finished discussing the Fairlight, and had moved on the PPG – explaining its wavetables, and the ability for it to scan a group of waves first in one direction and then back again, While I was scrawling this back and forth motion in my notebook, suddenly a little twinge went off in the back of my head, and my hand drew the next line arcing down the page.. and the concept of crossfading between waves in two dimension, not just one, was born.’

The name of this synthesizer was Prophet VS. It was able to mix four waveforms via joystick and multistage envelope. Other vector type synthesizers included Yamaha SY-22, SY-35, TG-33 and Korg Wavestaion (which is more than just a vector synth). On Yamahas with a joystick you were mixing two FM elements with two sample elements.
Wave sequencing
First introduced by Korg Wavestation, this method offers (as it name says) wave sequencing. A wavesequence is a series of waves (samples), each with its own level, duration, crossfade time (to the next wave), and transpose. Wavesequences can be stepped through automatically or via various modulation sources.

When you set crossfade to low value, you get those characteristic ‘rhythmic’ sequences, which are a trademark for Korg Wavestation. Ensoniq TS series also feature wavesequencing.
Wavetable synthesis
Best examples would be PPG Wave, and Waldorf Wave / Microwave series. Their process of sound creation is based on wave sequencing through a waveform table. It is important to note that these waveforms are single cycled – they are very short. We can imagine them like the storage of the spectral energy of a single cycle snapshot. They are called ‘waves’. These waves can then be combined into lists called ‘wavetables’.

You can apply various controllers like envelopes, LFO’s to select the entry in the wavetable you want to play. It is also possible to interpolate between subsequent waveforms to make the timbral change happen more smooth if desired. Although waveforms are short, you have so many modulation possibilities that no other sampleplayer synth can match.